Adding landscape lighting enhances the beauty, security, and functionality of any outdoor living space. Whether you’re illuminating a walkway with path lights, highlighting a garden with flood lights, or creating ambiance with low-voltage outdoor lighting, proper installation ensures long-lasting performance. This guide will walk you through everything you need to know about landscape lighting installation, from planning and selecting the right light fixtures to wiring and testing your system.
Need professional assistance? Get expert landscape lighting installation from Santa Barbara’s trusted electricians.
Understanding Landscape Lighting
Installing landscape lighting is more than just placing a few light fixtures around your yard. It requires thoughtful planning to ensure the right balance of aesthetics, safety, and functionality. Whether you’re looking to enhance outdoor living spaces, increase security, or highlight architectural and garden features, choosing the right lighting fixtures is key.
What Is Landscape Lighting?
Landscape lighting refers to the use of low-voltage outdoor lighting, path lights, flood lights, and other light fixtures to illuminate outdoor spaces. It enhances visibility at night, adds curb appeal, and improves safety by reducing dark spots around walkways and driveways.
Benefits of Landscape Lighting
Well-placed landscape lights offer several advantages, including:
Energy Efficiency – Using low-voltage transformers and LED bulbs can reduce energy consumption while providing ample brightness.
Increased Security – Well-lit outdoor areas deter trespassers and improve visibility.
Enhanced Aesthetics – Highlight architectural features, trees, and gardens with low-voltage lighting.
Better Functionality – Extend the usability of outdoor living spaces, making patios and gardens more inviting at night.
Types of Landscape Lighting
Choosing the right type of landscape lighting depends on your needs. Common options include:
Solar Landscape Lights
Powered by the sun, these are an eco-friendly choice that automatically turns on at night. While easy to install, they may not provide consistent brightness in shaded areas.
Low Voltage Landscape Lights
The most popular option for residential outdoor lighting, these lights connect to a low voltage transformer, making them energy-efficient and easy to install. They are ideal for path lights, accent lighting, and flood lights.
Low Voltage Landscape Lights
Operating at 120V, these are best for large areas and commercial properties. Installation requires professional expertise due to the higher voltage.
Planning Your Landscape Lighting Layout
Before installing landscape lighting, it’s important to create a well-thought-out plan. Proper placement of light fixtures ensures balanced illumination, energy efficiency, and an aesthetically pleasing outdoor space. This section will guide you through selecting the right components and mapping out your outdoor lighting system.
Determine Your Power Source
Your landscape lighting installation will require a power source. The most common options include:
Line Voltage Systems – Operates at 120V and requires professional installation for safety and compliance.
Solar-Powered Lights – Ideal for areas with direct sunlight, requiring no wiring or transformers.
Low Voltage Transformers – Converts standard household voltage (120V) to a safer 12V for low-voltage outdoor lighting systems.
Choose the Right Light Fixtures
Selecting the right light fixtures is essential for achieving your desired lighting effect. Consider the following options:
Wall Wash Lights – Create a soft, even glow on walls and fences for ambiance.
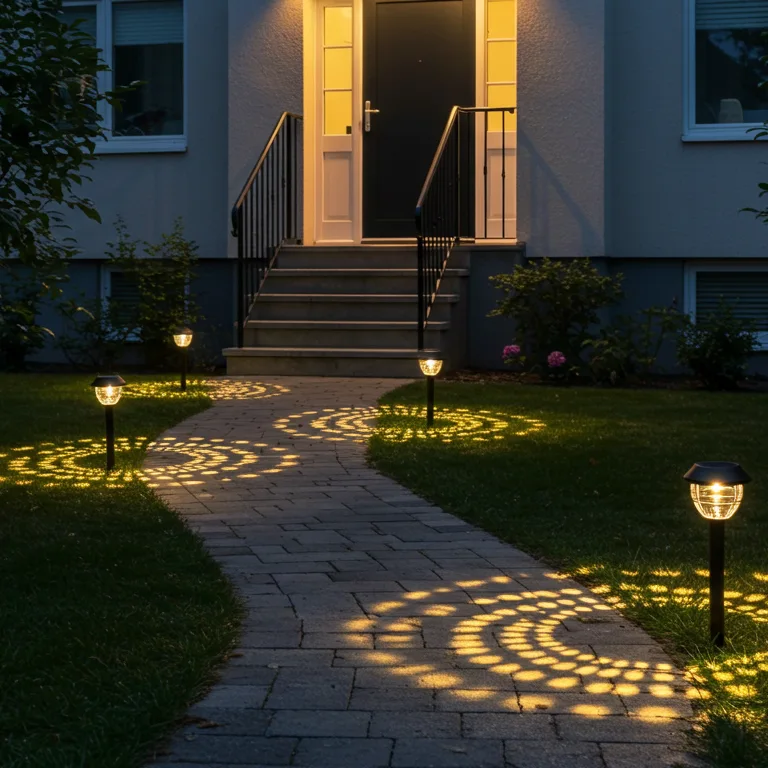
Path Lights – Illuminate walkways, driveways, and garden edges for safety and aesthetics.
Flood Lights – Provide broad illumination for security and highlight large outdoor living spaces.
Spotlights – Used for accent lighting to highlight trees, statues, or architectural elements.
Selecting the Best Transformer
A low voltage transformer is necessary for low voltage lighting systems. When choosing one, consider:
Expandable Capacity – Choose a transformer that allows room for additional lighting fixtures in the future.
Wattage Capacity – Ensure the transformer can handle the total wattage of your connected light fixtures.
Timer and Dusk-to-Dawn Sensors – Automate your landscape lighting for energy efficiency.
Deciding on Wire and Connectors
The right wiring ensures safe and efficient operation. Key considerations include:
Low Voltage Wire – Typically 12-gauge or 14-gauge, depending on the distance and wattage load.
Wire Connectors – Waterproof connectors ensure durable and weather-resistant connections.
Burying Wires – Wires should be buried at least 6 inches underground for protection and a clean look.
Mapping Out Light Placement in Outdoor Living Spaces
Create a layout plan by:
Identifying Key Areas – Walkways, patios, garden beds, and security points.
Using a Sketch or App – Plot out light fixture placements to ensure balanced illumination.
Avoiding Light Pollution – Position lights to minimize glare and avoid over-illumination.

Tools and Materials Needed
A successful landscape lighting installation requires the right tools and materials to ensure efficiency, safety, and durability. Having everything ready before starting the installation will make the process smoother.
Essential Tools for Installation
To install low voltage landscape lighting, you’ll need:
Tape Measure – To maintain even spacing between landscape lights.
Shovel or Trenching Tool – To bury wiring and keep cables concealed.
Wire Strippers – For cutting and stripping low voltage wire.
Drill and Screws – For securing low voltage transformers and fixtures.
Voltage Tester – To ensure proper power flow before connecting lights.
Low Voltage Transformers and Components
A low voltage transformer is essential for converting standard 120V household power into 12V for outdoor landscape lighting. Choose a transformer based on:
Automatic Timers – Some models include dusk-to-dawn sensors or programmable timers.
Wattage Needs – Ensure it supports the total wattage of all light fixtures.
Weather Resistance – Use outdoor-rated transformers for durability.
Choosing the Right Cables and Wire Gauge
Using the correct low voltage wire ensures stable and efficient power distribution. Key considerations:
12-Gauge Wire – Best for long distances and multiple light fixtures.
14-Gauge Wire – Suitable for shorter runs and fewer fixtures.
Weatherproof Insulation – Prevents damage from moisture, UV rays, and temperature changes.
Safety Precautions Before Installation
Prioritizing safety is crucial when working with landscape lighting:
Keep Transformers Elevated – Install low voltage transformers at least 12 inches above the ground to avoid water damage.
Turn Off Power – If working with existing wiring, shut off the power at the breaker.
Mark Existing Utility Lines – Call your local utility company before digging.
Use Waterproof Connectors – Prevent electrical shorts and corrosion.
Step-by-Step Installation Guide
Installing landscape lighting requires careful execution to ensure efficiency, safety, and durability. Follow these steps to properly install low voltage landscape lights, solar landscape lights, or line voltage lighting based on your needs.
Installing Solar Landscape Lighting
Solar lights are the simplest outdoor lighting solution, requiring no wiring or transformers.
Determine the Layout
Place solar landscape lights in areas that receive direct sunlight for at least 6-8 hours daily.
Space them evenly along pathways, garden beds, or accent areas to ensure balanced illumination.
Assemble and Install the Lights
Push the light stakes into the ground at the desired locations.
Adjust the angles for optimal light coverage.
Allow solar panels to charge fully before first use.
Installing Low Voltage Landscape Lighting
A low voltage landscape lighting system is energy-efficient and provides reliable illumination.
Marking Existing Cables and Irrigation Lines
Before digging, mark underground utility lines to avoid damage.
Plan wire routes to minimize exposure and reduce the risk of tripping hazards.
Placing the Lights
Position light fixtures according to the planned layout.
Keep path lights spaced 6-8 feet apart for even lighting.
Angle flood lights and spotlights to highlight key landscape features.
Running the Wires
Lay the low voltage wire along the planned route.
Avoid sharp bends or placing wires in high-traffic areas.
Connecting the Lights
Strip the low voltage wire ends and attach them to each light fixture using waterproof connectors.
Secure connections tightly to prevent moisture damage.
Wiring the Transformer
Mount the low voltage transformer on an exterior wall near a power source.
Connect the landscape lighting wire to the transformer’s terminals.
Ensure the transformer wattage matches the total wattage of all lights.
Setting Up the Timer for Automationx
Many low voltage transformers include built-in timers or dusk-to-dawn sensors for automatic operation.
Adjust settings to turn lights on at sunset and off at sunrise for energy efficiency.
Testing the System
Turn on the transformer and check each landscape light for proper function.
Adjust angles and brightness as needed.
Burying the Wires and Finalizing Installation
Use a shovel or trenching tool to bury wires at least 6 inches deep.
Cover trenches with soil and compact the area to secure the wiring.

Installing Line Voltage Landscape Lighting
For large-scale outdoor lighting, line voltage landscape lighting (120V) may be required.
When to Use Line Voltage
Suitable for commercial properties, large outdoor areas, or high-power lighting needs.
Requires weatherproof electrical boxes and conduit wiring.
Professional Installation Considerations
Due to higher voltage, line voltage lighting installation should be handled by a licensed electrician.
Must comply with local electrical codes for safety.
Adjusting and Testing Your Landscape Lighting
Once your landscape lighting installation is complete, fine-tuning the placement and brightness of your light fixtures ensures optimal performance. Proper adjustments prevent dark spots, glare, and unnecessary energy use while enhancing the overall ambiance of your outdoor living spaces.
Checking Light Angles and Brightness
Adjust path lights to ensure even illumination without creating harsh shadows.
Tilt flood lights and spotlights to highlight key landscape features while avoiding direct glare into windows.
If lights appear too dim, check the low voltage transformer settings and ensure there are no loose connections.
Fine-Tuning Fixture Placement
Walk around your yard at night to see how the landscape lighting looks in real conditions.
Adjust the height and angle of light fixtures to create the desired effect.
If necessary, reposition low voltage outdoor lights to eliminate any dark spots or overlapping brightness.
Ensuring Even Light Distribution
Avoid excessive brightness in one area while other parts remain too dark.
Space path lights evenly along walkways for a consistent glow.
Use low voltage transformers with multiple output options to balance power distribution across all light fixtures.
Making these final adjustments ensures your outdoor landscape lighting looks professional and functions efficiently.
Maintenance and Troubleshooting
Regular maintenance keeps your landscape lighting system performing at its best. Over time, light fixtures, low voltage transformers, and wiring may require adjustments or replacements. Here’s how to maintain your outdoor lighting and troubleshoot common issues.
How to Maintain Landscape Lights for Longevity
Clean Light Fixtures – Dirt and debris can reduce brightness. Wipe down path lights, flood lights, and spotlights with a damp cloth.
Check for Water Damage – Ensure wire connectors and low voltage transformers are sealed and weatherproof.
Trim Overgrown Plants – Prevent bushes and trees from blocking landscape lights or causing overheating.
Inspect Wires Regularly – Look for exposed or damaged low voltage wiring, especially in areas with heavy foot traffic.
Replace Burned-Out Bulbs – Use energy-efficient LED landscape lights for longer-lasting illumination.
Common Issues and Fixes
Even with proper installation, landscape lighting systems may experience occasional problems. Here’s how to address them:
Flickering or Dim Lights
Check for loose wire connections at the transformer or light fixtures.
Ensure the low voltage transformer has enough wattage to power all connected landscape lights.
If using LED bulbs, verify they are compatible with the transformer’s voltage.
Transformer Issues
If the low voltage transformer is not working, reset the breaker and check for tripped circuits.
Ensure the transformer is properly grounded and installed at the correct height.
If the timer isn’t functioning, adjust the settings or replace faulty components.
Wire Connection Problems
Inspect wire connectors for corrosion or damage.
Re-bury any exposed low voltage wires to prevent weather-related wear and tear.
Use waterproof wire connectors to maintain a secure and safe electrical connection.
Upgrading to Energy-Efficient LED Landscape Lights
LED bulbs consume less power and last longer than traditional halogen bulbs.
Many LED landscape lights include smart control options, allowing you to adjust brightness and timing remotely.
Upgrading to LED fixtures can reduce energy costs while improving overall illumination.
Enhance Your Outdoors with Landscape Lighting
A well-planned landscape lighting installation enhances the beauty, security, and functionality of your outdoor living space. Whether you’re using low voltage lighting, solar-powered fixtures, or line voltage systems, proper planning and installation ensure long-lasting performance.
By selecting the right light fixtures, placing them strategically, and maintaining them regularly, you can create a visually stunning and safe outdoor environment. If you’re looking for professional help with landscape lighting installation, contact the experts at Santa Barbara Electricians for high-quality solutions tailored to your needs.
FAQs About Landscape Lighting Installation
1. What Is the Best Type of Landscape Lighting?
The best landscape lighting depends on your needs. Low-voltage landscape lights are energy-efficient and versatile, solar lights are eco-friendly, and line-voltage lights provide powerful illumination for large areas.
2. How Deep Should I Bury Landscape Lighting Wires?
To protect low-voltage landscape lighting from damage, wires should be buried at least 6 inches underground. Line-voltage wiring may require deeper burial and must follow local electrical codes.
3. How Long Do LED Landscape Lights Last?
LED landscape lights are highly durable, lasting between 30,000 to 50,000 hours depending on usage. Compared to halogen bulbs, LEDs use less energy and require minimal maintenance.